
Please follow below steps to set email profile and send an email in MSM Admin.
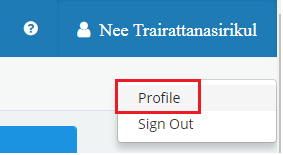
1. If you wish to use PHPS band or band committee email instead of your personal email you can add those emails in your MSM Admin Profile. Email address in Profile will be used in From Email field later on. In MSM Admin, click on your name on the top right corner then select Profile.
In Send Emails From, click on Add Email Address.

Enter Name and Email then click on Add.

2. To send an email, go to Dashboard then select band that you want to send email and click on Email.

3. Select From Email then enter details and click on Send Email. You may select Attachments or Templates for your email. (Note: Attachments and Templates can be created/uploaded under Library menu on the left).

| Note: Email Templates are available under Library menu and you can select template then change text per your requirements.
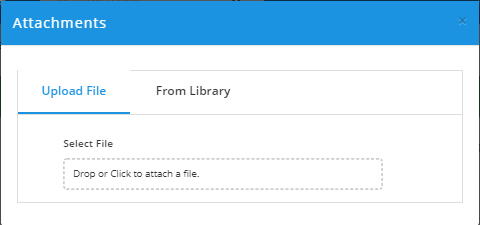
Note: How to upload attachment.
|


4. To verify email delivery status, go to Dashboard then click on > under Activity Logs for recent email sent. If your email has been sent earlier but not displayed on screen you can select on View All Activity to view all activities including all sent emails.

5. In Dashboard/Email Log, go to Recipients to view email status.
Delivered in green background means email successfully sent. You can also see if email has been opened.
Bounced in red background means email unsuccessfully sent. Any bounced email you can manually send to individual student.

Happy Emailing!
![]() Any questions please contact phpsband@gmail.com.
Any questions please contact phpsband@gmail.com.